
Feeding IR
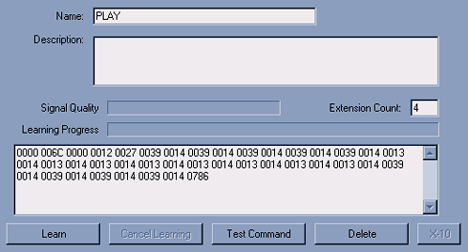
Select the disired command under the device in the IR Library. To learn an IR code, click the Learn button. Point
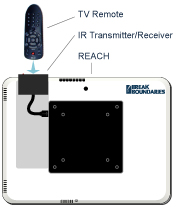
the remote at the IR transmitter/receiver. If you
turn the REACH system over, the IR transmitter/receiver will be located on the top left
corner on the back of the REACH system.
On the remote, click the button for the IR command that you would like REACH to learn. The red LED
light on the IR transmitter/receiver will blink if it was received. The “Signal Quality” denotes how well it
received the command. (Note: in some tests, we noticed that fluorescent lights sometimes affect the
signal quality. To remedy this, turn off the lights in order to learn IR commands.) The “Learning
Progress” denotes whether it was learned. If you do not hold down the button long enough, the “Learning
Progress” bar will not complete.

If the “Learning Progress” bar does not reach the end, click the button on the remote again, while pointing
it at the IR transmitter/receiver. Continue repeating this step until the “Learning Progress” is complete.
Once the IR command is received, it will store the command and display it in the text box, and be listed
as a group of numbers and letters as shown below (if no numbers or letters are shown, the IR
command was not received correctly):
<
It is recommended that you test each IR command individually by clicking the Test Command button.
The IR transmitter/receiver will send out the command to the device (keep in mind, your IR Kit must
already be installed for the test to work without line-of-sight). If the test fails to work, learn the IR
code again.
When you are finished making your changes to the IR codes, and you exit the library, be sure to save your
work with the Save button , or you may risk losing all of the codes that you have just learned.
Trouble Shooting
The most common reason for not receiving a full IR code is the batteries in the remote do not have a full charge.
Replace the old batteries with new ones.
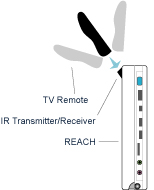
Another reason for not receiving a full IR code may be due to the angle of the remote.
Try tilting the remote and vary the distance from the IR receiver/transmitter.
Finally, some remotes transmit IR signal less efficiently than others.
Try tapping the button many consecutively times very fast.
Assembling the IR Kit
The IR Receiver should be placed in the area of the room that the user and the back of the REACH unit are facing. In other words, the IR Transmitter on the back of REACH should be in "line-of-sight" of the IR Receiver.
 If there is a drop ceiling, or the area above the ceiling is easily accessible then it may be best to place an IR receiver in the ceiling in the center of the room.
In this case, an "In-Wall" receiver is used in place of the "table top" receiver. The "In-Wall" Receiver is illustrated in the picture to the right.
Be sure to specify which style of receiver you'd prefer to use when ordering.
 IR Emitters
IR Emitters are not necessary for REACH to communicate with devices that receive IR, such as a TV, but the emitters will greatly improve the response of the devices, especially if the device is not in "line-of-sight" of the REACH unit.
IR Emitters only come with a 6.5 foot wire, but we do offer 50 foot extention cables for devices that are further away from the IR Connecting Block..
|
|