

 Copy & Paste Copy & Paste
Multiple Actions
Volume Controls
Button Aesthetics
“Favorites” Menus
Standby Mode
Telephone
Copy & Paste
Using the On-Screen Keyboard (see figure 1), you can copy and paste. This can be used to copy and paste captions on buttons, locations of sound files or images, and even whole buttons. For example, if you had a button on the main menu that you want to appear on all the menus (such as nurse call), you would simply click on the button to highlight it, then click “ctrl”, then click “c”. Now you’ve copied the button along with all it’s properties. Next, you would go to another menu and click ”ctrl”, then click “v”, and now you have pasted the button in the same location on screen but in a different menu.
Figure 1
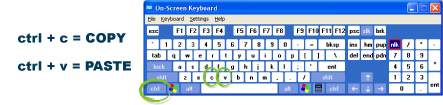
Below, examples of what can be copied/pasted are circled.
Multiple Actions
Sometimes it makes since to use multiple actions. This can make REACH more efficient for the user. For example, when the user selects the DVD player it would be beneficial for the TV to automatically adjust to the right input.
 Note:
Note:
The “System.Wait” command is sometimes necessary when
a device requires a slight delay between commands.
Multiple “System.Wait” commands can be added in a row if
the device requires a longer delay
On the contrary, sometimes it makes sense not to use multiple actions. For example, when the user selects the DVD player you might think it would be beneficial for the DVD player to automatically power on. But, if the DVD player was already on, this would force the DVD player to power off. This is because the power button on most DVD players perform two functions; press once to power on, press again to power off.
Volume Controls
On a television, stereo, or other similar device, volume is usually adjusted in small increments.
You may notice a volume bar on some televisions that adjust one line at a time. With a conventional television remote the “volume buttons” can be held down to adjust the volume many lines at a time.
However, in REACH, a “Television.Volume Up” action will only adjust the volume one line. If the user has to command REACH many consecutive times to raise the volume to an acceptable level, it can be a little frustrating.
To prevent this frustration, multiple “Television.Volume Up” actions can be added in a row.
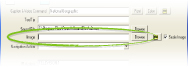
A good rule to follow is “three up and two down”. This means to add three “Television.Volume Up” actions in your “volume up” button and two “Television.Volume Down” actions in your “volume down” button (see figure 2).
The “volume up” button will now change the volume at a faster rate, while the “volume down” button can be used for finer tunning of the volume.
Figure 2

Button Aesthetics
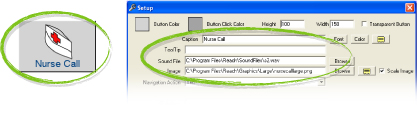
Buttons most commonly have both an image and text displayed on them so that the user can recognize it’s action. In some cases, the image and the phrase may be so similar that it is redundant (see figure 4). For aesthetic reasons, one might want to only show one or the other to eliminate this redundancy.
To eliminate the image, simply highlight the path in the “Image” field and delete it (see figure 3). The result is a more appealing button, but lacks the aesthetics of the image (see figure 5).
To eliminate the text it’s best to hide it by changing it’s font to 2 and it’s color to that of the background of the button (see figure 6).
Note: It’s important not to delete that which is in the “Caption & Voice” command field. The result would disable the voice activation of that button.
Figure 3
Figure 4
Figure 5
Figure 6


“Favorites” Menus
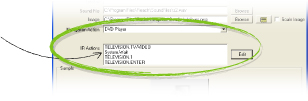
When setting up a television, stereo, or telephone
menu, it’s wise to create “Favorites” menus. For the
television and stereo, this is a menu with buttons
containing preprogrammed channels in them (see figure 7).
For a telephone, the buttons will have preprogrammed
phone numbers in them. These menus are helpful to the
user in that they provide efficiency when selecting a
channel or phone number. It’s a one touch solution to
an otherwise seemingly daunting task.
Figure 7
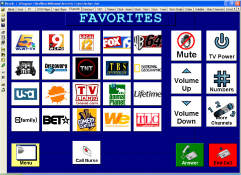
Figure 8
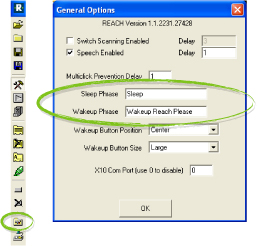 Standby Mode
When using REACH with voice activation, the system offers
a feature for “standby mode”. This feature allows the user to
put the system “to sleep” when not currently using the the system
to perform an action. This “standby mode” prevents the system
from inadvertantly hearing a conversation or background noise
from a television, and performing an undesired action.
This feature can be found in the “general options” menu by
clicking the “general options” button on the tool bar (see figure 8).
When choosing a “Sleep Phrase” or Wakeup Phrase” it’s
important to consider the number of syllabals or complexity
of the phrase. The “Sleep Phrase” can be a short, one syllabal
phrase, for there is no harm in the system mistaking background
noise for the “Sleep Phrase” command, resulting in the system
going into “standby mode”.
Not true for the contrary. For example, if the user is asleep and
the system mistakes background noise for the “Wakeup Phrase”,
then the system will come out of “standby mode” and continue mistaking background noise for other commands such as, operating the bed, or turning on the stereo.
To prevent this unfortunate occurrance from happening, it is important to choose a more complex “Wakeup Phrase”. The more complex the phrase, the less the system will mistake it.
Note: Performing multiple voice trainning sessions and properly adjusting the profile adjustments will result in better recognition of REACH, and less mistakes of commands or background noise.
Telephone
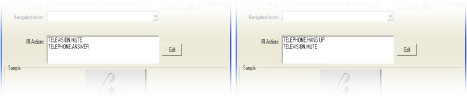
When using REACH in conjunction with the recommended telephone, it can be helpful to include a few additional actions into some of the buttons. These buttons include the answer and hang up buttons, as well as preprogrammed phone number buttons.
First, it may be benificial to include a “Television.Mute” command in with the answer button (see figure 9). If the user is watching televison and the phone rings, the answer command will automatically mute the television, making it easier to hear the person over the speaker phone.
To un-mute the television once the call has ended, we recommend including a “Televison.Mute” command in with the hang up button as well (see figure 10).
Figure 9
Figure 10
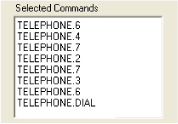
Finally, adding a “Telephone.Dial”
action in a preprogrammed phone number button can make dialing
a phone number more efficient (see figure 11).
Figure 11
|
|