 Ordering a Bed Controller
Before ordering a Bed Controller it's important to collect all of the proper information from your customer.
Information needed:
Brand of bed (Invacare, Hill-Rom, etc.)
Model Number of bed
Serial Number of bed
Functions on hand pendant (Head Up, Head Down, Foot Up, etc.)
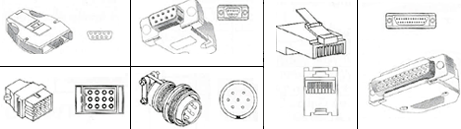
Type of connector on hand pendant? How many Pins?
(digital photos are helpful)
New Style Bed Controllers

The RESPONSE 2000 is designed to operate an electric bed remotely, through the REACH ECU and/or the Hand Held Wireless Remote.
This interface is custom wired to operate the users specific equipment.
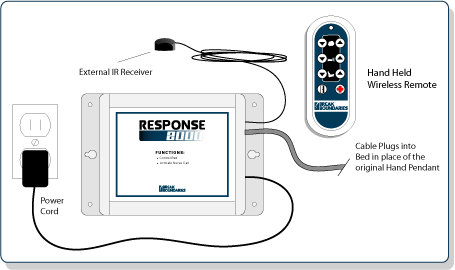
Instructions:
Simply plug the cable into the port on the bed that was originally designated for the hand pendant.
Plug the power cord into a power outlet.
And place the External Receiver in an area that is in the “line-of-sight” of REACH or the Wireless Remote.
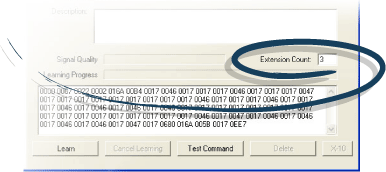
To increase the travel of bed movement, simply increase the extension count in the REACH software.

The RESPONSE 3000 is designed to operate an electric bed, nurse call system, and motorized door remotely, through the REACH ECU and/or the Hand Held Wireless Remote.
This interface is custom wired to operate the users specific equipment.
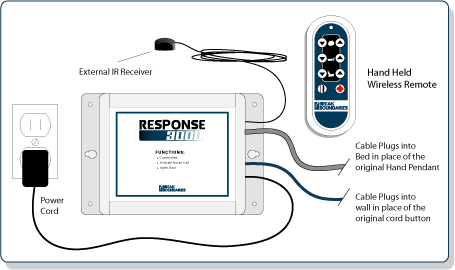
Instructions:
Simply plug the cable into the port on the bed that was originally designated for the hand pendant.
Plug the other cable into the port on the wall that was originally designated for the nurse call button.
Finally, plug the power cord into a power outlet, and place the External Receiver in an area that is in the “line-of-sight” of REACH or the Wireless Remote.
To increase the travel of bed movement, simply increase the extension count in the REACH software.
 Old Style Bed Controller
Operating the Bed Controller
The Break Boundaries Bed Controller is custom wired to the users specific bed.
It has a connection that should match the connection of the existing hand pendant of the bed. Simply, unplug the existing hand pendant and plug in the Bed Controller in it’s place.
When operating the bed for the first time, make sure that all of the dip switches of the
Bed Controller are in the up position before plugging in the power cord.
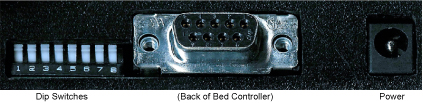
The Bed Controller has 8 dip switches located on the backside of the box. These dip switches are numbered and can be used to change either how long each command moves each appropriate bed function or the IR code set used by the box. Anytime the dip switches are changed, the bed control unit must be rebooted in order for the changes to take place. This is accomplished by unplugging the unit from power for ten seconds and plugging it back in. Removing power should always be done at the bed control unit and not at the wall transformer. This simple recycle of power will allow the unit to acknowledge the new dip switch settings.
Switches 1,2,3 control how long the relays are latched for or how long the bed will move. See the chart below.
|
.
|
Dip Switches
|
.
|
Motor Run
|
|
1
|
2
|
3
|
Time
|
|
UP
|
UP
|
UP
|
1 SECOND
|
|
DOWN
|
UP
|
UP
|
2 SECONDS
|
|
DOWN
|
DOWN
|
UP
|
3 SECONDS
|
|
UP
|
DOWN
|
UP
|
5 SECONDS
|
|
UP
|
UP
|
DOWN
|
10 SECONDS
|
|
DOWN
|
UP
|
DOWN
|
15 SECONDS
|
|
UP
|
DOWN
|
DOWN
|
20 SECONDS
|
|
DOWN
|
DOWN
|
DOWN
|
30 SECONDS
|
Switch 4 controls the IR code set being used by the bed controller. Up is the default setting and uses the IR code set “Bed (Code Set 1)” in the IR Library. This is the code set that REACH uses standard. Each code will already be programmed for each button.
Dip switch 4 down will use IR code set “Bed (Code Set 2)” in the IR Library. Use this code set if there is and IR conflict with other devices such as another bed controller in the room. Under Setup in REACH, each button will have to have their IR Actions changed to Bed (Code Set 2) and the buttons appropriate command.
(NOTE: If any of the dip switches 5 through 8 are in the down position,
the bed will no longer recognize commands.)
____________________________________________
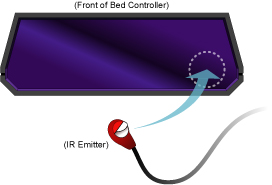 Infrared Signal
If using the IR Kit for better signal strength,
peel the backing from an IR emitter and
place it on the front of the Bed Controller
in the lower right hand corner.
|
|